This chapter describes semi-automatic segmentation of fat and muscle
on abdominal CT images. The purpose of this segmentation
is to delineate various compartments of fat and muscle and measure
the areas and volumes of each compartment. These measurements have
been shown to correlate with certain clinical indicators
(see References).
The steps below use the commands under the main menu’s
Workflows > CT Abdominal Fat Segmentation group to create
the segmentation masks (ROI layers) with automatically assigned names,
including:
The workflow is intended for segmenting CT abdominal images with
the field-of-view that extends from the diaphragm to the sacrum.
The commands in this workflow enable segmentation in two different modes:
single slice (2D) and multi-slice (3D). The 2D commands are labeled
“single slice”. Similarly named commands without the “single slice”
label perform 3D segmentation.
After the images are loaded in FireVoxel, the initial step for both
2D and 3D processing is the fully automatic total fat segmentation
(Segment Whole Fat Mask).
The next step is the segmentation of subcutaneous and visceral fat
(SAT and VAT, respectively), which can also be done automatically
(Produce Subcutaneous and Visceral Fat Masks).
The volumes of SAT and VAT compartments, as well as the visceral fat fraction
VAT/(SAT+VAT), can be measured for both automatically and manually segmented ROIs
(Measure VAT/(SAT+VAT) ratio).
For 2D manual ROIs obtained with AC, area measurements of SAT, VAT, MAT
and muscle may also be obtained
(Measure SAT, VAT, MAT and Muscle).
In 3D, manual segmentation may be done by defining the AC contour on every slice
(by copying the contour to multiple slices and adjusting it)
or using the ROI operations
(Define Abdominal Cavity using Paintbrush).
To load CT images in the DICOM format, start FireVoxel and use the main
menu to select File > Open DICOM Single Document.
This opens the DICOM Tree dialog
(Fig. 26.1) that allows the user
to preview and select images to be loaded. Select (click on series name)
or check (check box) the abdominal CT series and click Load.
This will open the dialog titled
Load Volume value conversion, specifying
options for the conversion from Hounsfield units (HU) to signal intensity.
Accept the default settings, Load as Unsigned Integer Volume.
With this transformation, air (-1024 HU or -1000 HU, depending
on the manufacturer) is assigned 0 grayscale intensity and water is +1024.
Click OK to load the images.
Save the document by selecting on the main menu
File > Save FireVoxel Document. The user may wish to save
the document after each processing step to avoid losing results.
Images can be displayed in Film view or Slice view.
To toggle between the views, double-right-click on the image.
In Slice view, use Up and Down arrow keys on the keyboard
or scroll the mouse wheel to scroll through slices.
To view the layers in the document (essential in this
procedure), double-left click on the image to open the
Layer Control panel.
After the images are loaded, only the base image layer is present.
Navigate to the slice to be segmented by scrolling the mouse wheel or
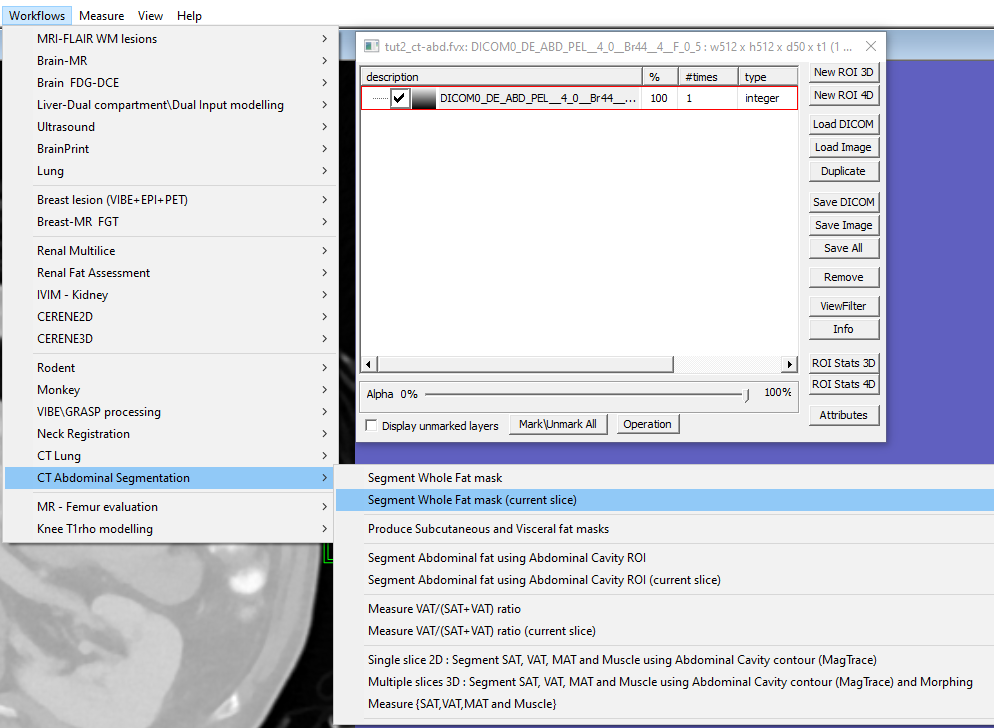
pressing Up and Down arrow keys. The first step is the automatic
segmentation of the total fat on the selected slice. On the main menu,
select Workflows > CT Abdominal Fat Segmentation >
Segment Whole Fat mask (current slice) (Fig. 26.2).
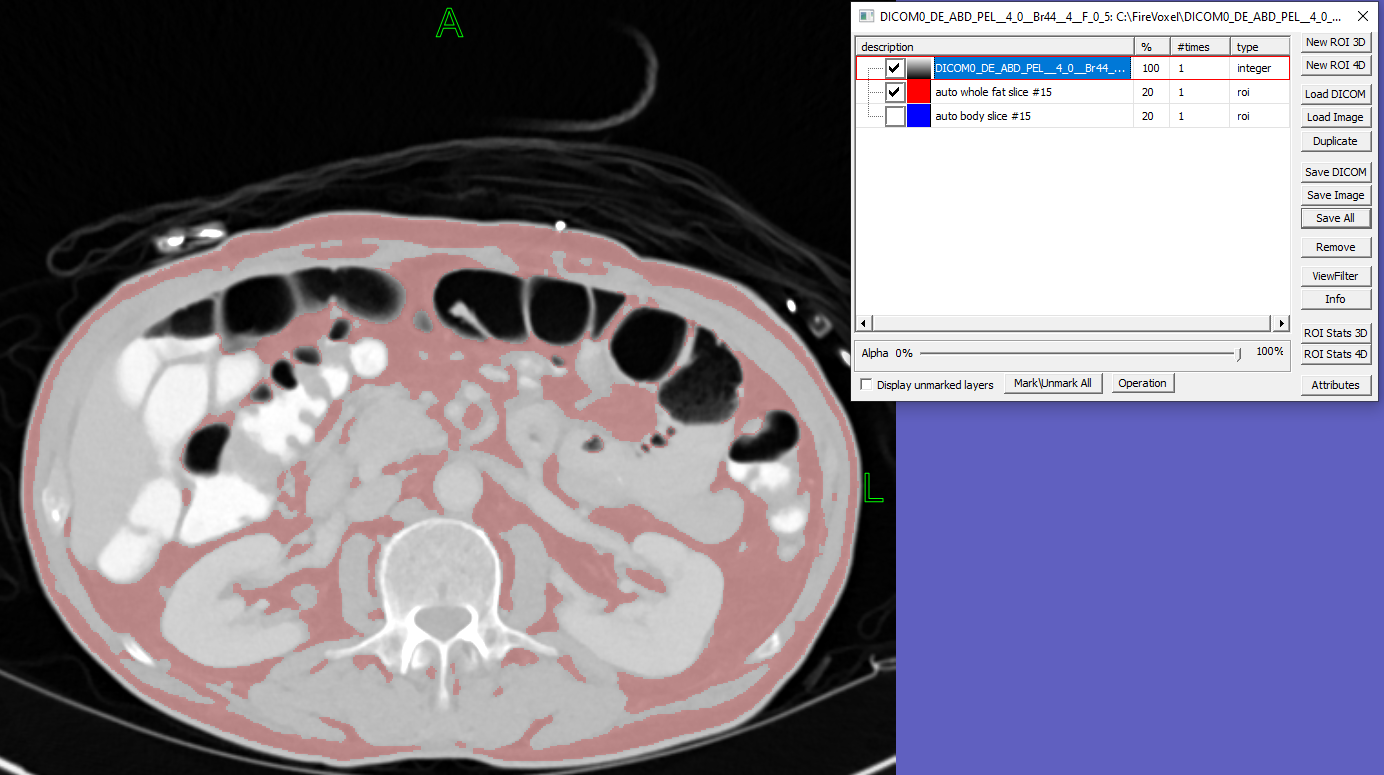
In more detail, the whole fat segmentation is done as follows.
First, the Body Mask is detected to remove all objects outside
the trunk. The mask is thresholded and followed by mask erosion,
dilation and connected component operations.
The image outside the Body Mask is then cleared to form the Clipped Image.
Median filter (radius=2 voxels) is applied to reduce the noise
while preserving the edges. The Clipped Image is then thresholded with fat
interval, default = [-120,-90] HU, to form the initial Whole Fat Mask (WFM).
The WFM is then eroded and dilated by one voxel to remove the fringe
of partial volume voxels on the surface of the Body Mask. Salt & Pepper
filter is applied to WFM to remove the remaining small imperfections.
In 3D, the mid-pelvis slice is detected by analyzing the distribution
of the bone signal. Starting from mid-pelvis slice, the distribution
of the lung signal is analyzed to determine the bottom of the diaphragm.
WFM is then clipped outside the pelvis and diaphragm slices to produce
the final WFM.
26.3. Produce Subcutaneous and Visceral Fat Masks
This step automatically separates the total fat mask into subcutaneous
and visceral fat masks (SAT and VAT, respectively).
Make sure that the base image and the auto whole fat slice
#[number] (TAT) layer are checked (visible). Select Workflows > CT
Abdominal Fat Segmentation > Produce Subcutaneous and Visceral Fat
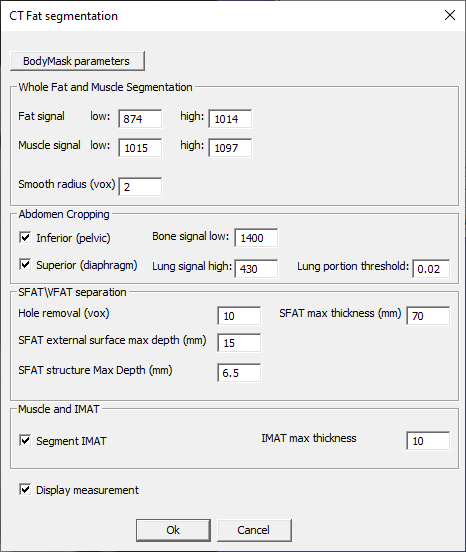
Masks (current slice). This opens the CT Fat Segmentation Dialog.
Accept defaults and click OK. During processing, the
status bar in the lower left corner of the software window will show
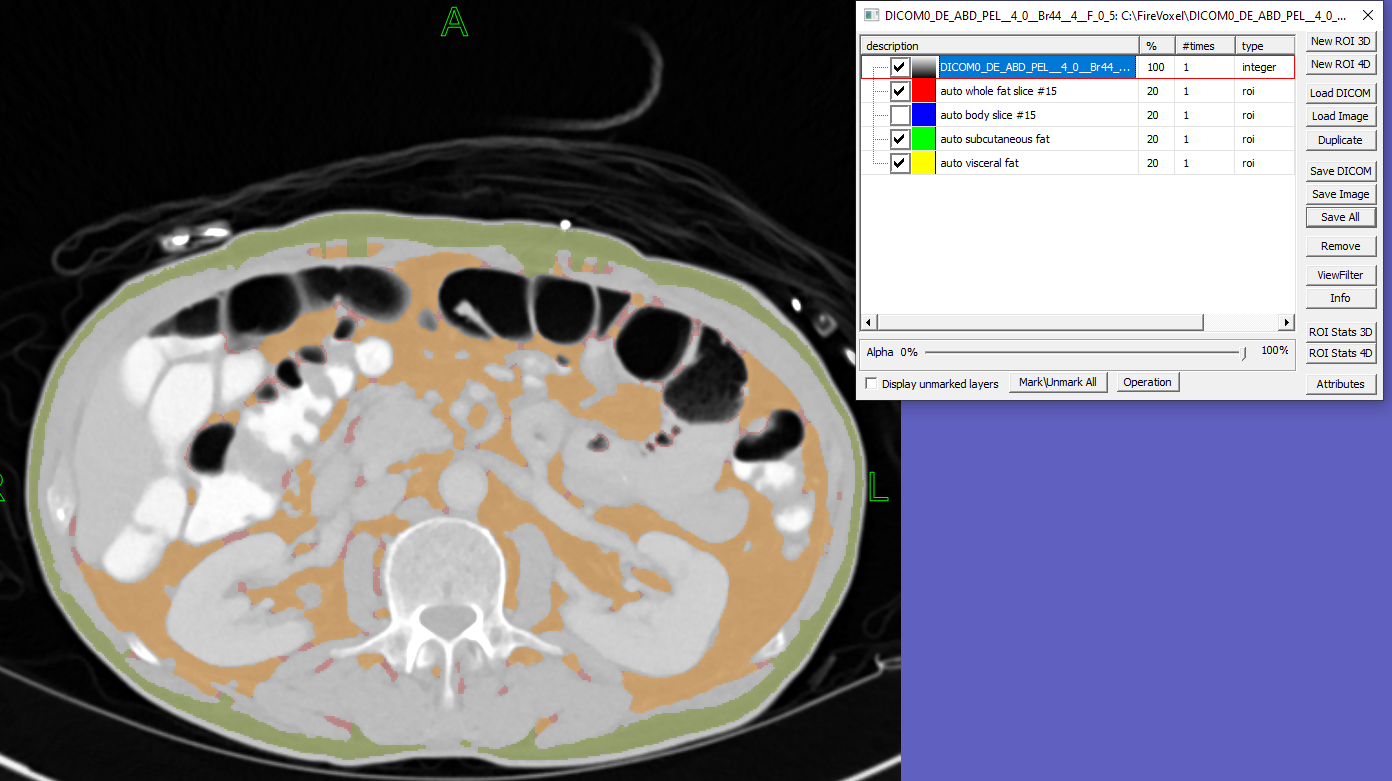
the current processing step. When completed, the command creates two
new ROI layers (Fig. 26.5):
auto subcutaneous fat (SAT mask),
auto visceral fat (VAT mask).
26.4. Segment Abdominal fat using Abdominal Cavity ROI (current slice)
This step describes a method to create SAT and
VAT masks with the help of a user-defined Abdominal Cavity
(AC) ROI layer. Here, this method and its results are labeled
manual segmentation.
Fig. 26.5 Subcutaneous and visceral fat segmentation result.
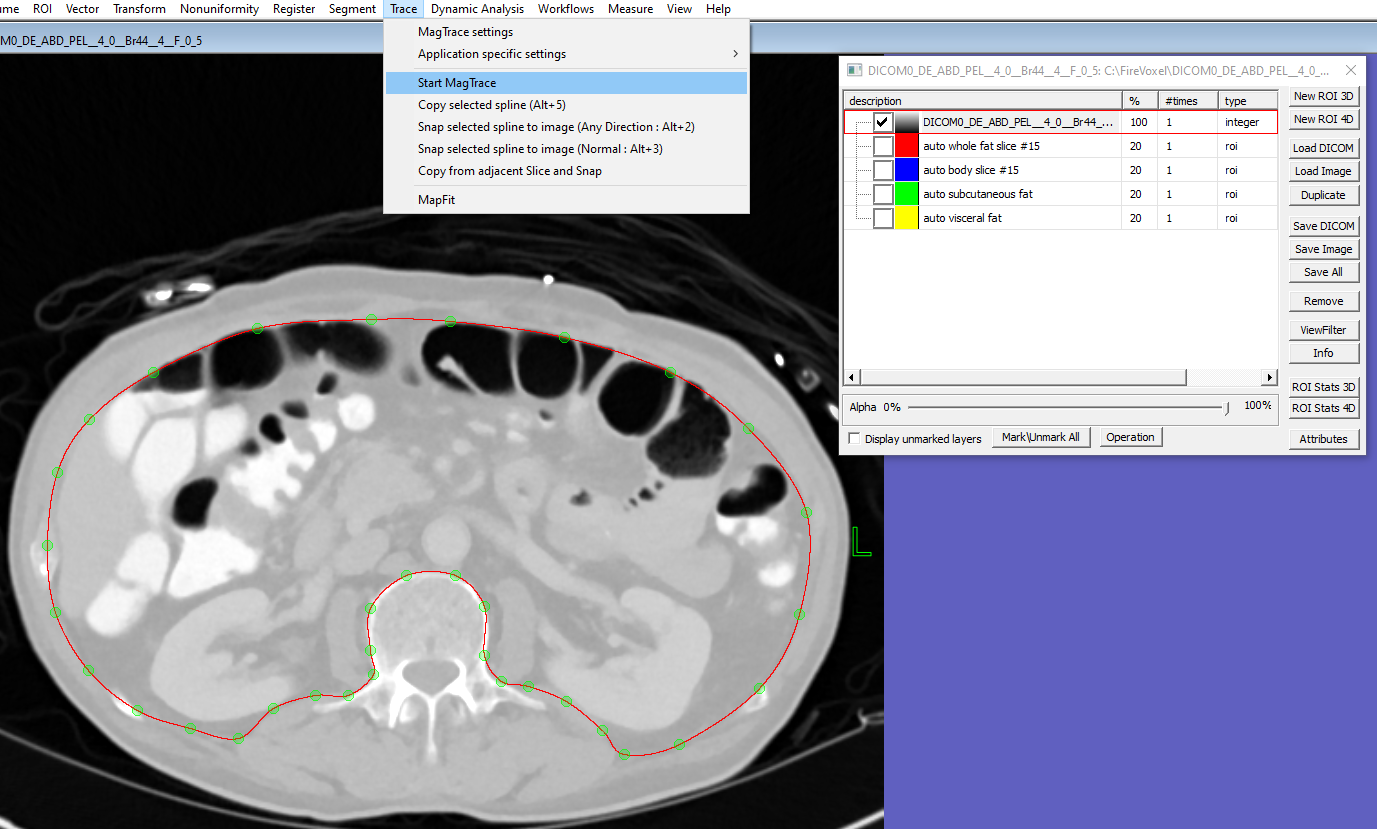
The Abdominal Cavity ROI may be created using the Magnetic Trace tool
(MagTrace, Trace). The user draws a MagTrace vector contour
around the abdominal cavity, including the abdominal organs and
visceral fat inside the contour and leaving the muscle, bones, and
subcutaneous fat outside (Fig. 26.6).
To start MagTrace, on the main menu, select Trace >
Start MagTrace.
Click along the boundary of AC to place about 20 anchor points (green circles
in Fig. 26.6). Press Esc to finish and exit from the MagTrace tool.
To reposition an anchor point, click the contour to display the
anchor points, hover the mouse over the point and drag it to the new
location. To add an anchor point, hover the cursor over the contour and
press Alt+1. To delete an anchor point, hover the cursor over the point
and press Alt+4. To activate the contour click on the contour; to
deactivate, click anywhere outside the contour. All anchor point
adjustments are done after exiting from the MagTrace tool.
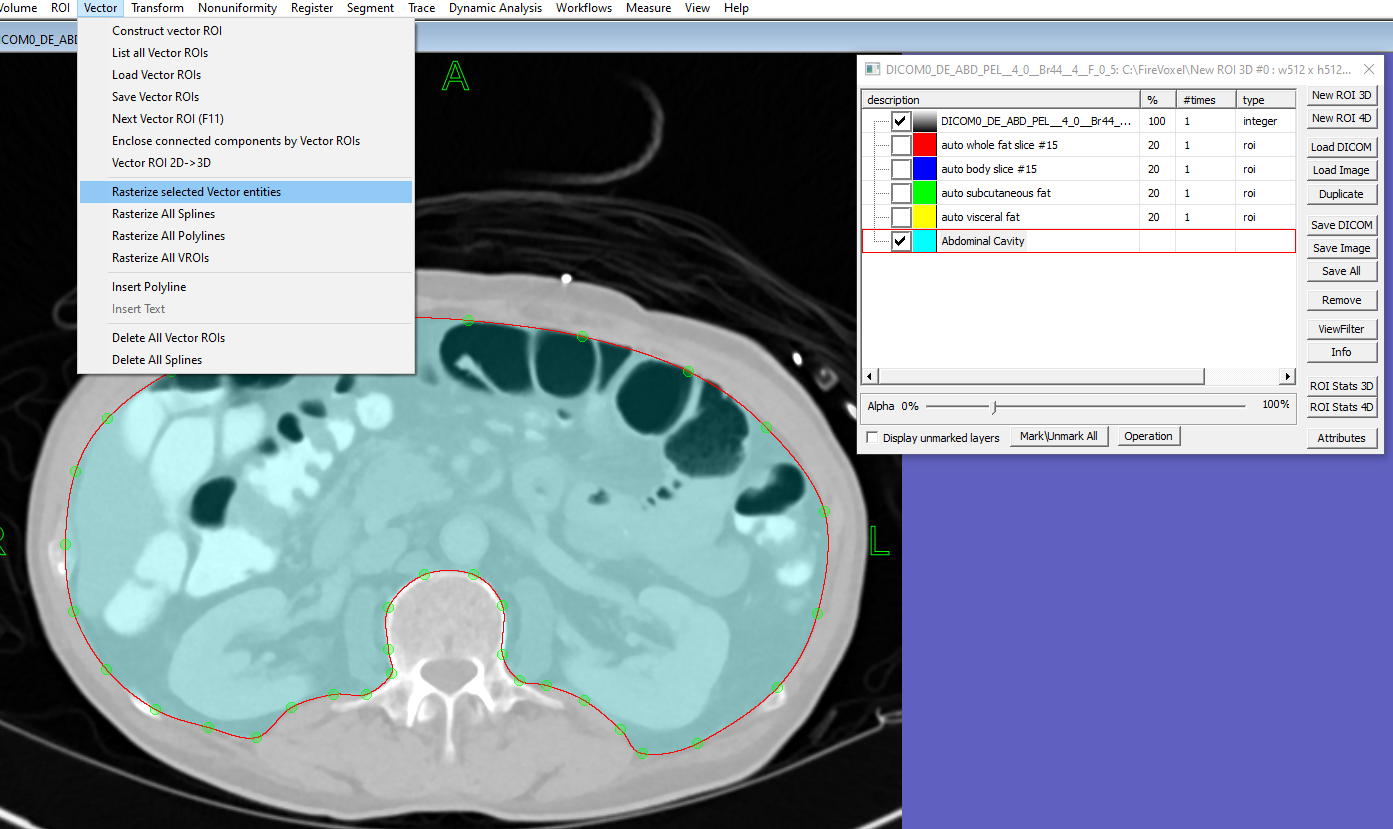
Now this vector contour can be used to create a raster ROI layer.
Uncheck all ROI layers. With only the base (image) layer visible,
click on the contour to activate it and select Vector >
Rasterize selected Vector entities.
This creates a new ROI layer, named New ROI 3D #[roi number],
with the voxels inside the MagTrace contour filled with color
(Fig. 26.7). Rename this layer Abdominal Cavity
(double-click the layer name in the Layer Control,
type in a new name in the box that opens and click OK).
Alternatively, the user may first create a new ROI layer (Layer Control >
New ROI 3D), rename it Abdominal Cavity, make it the active ROI layer,
and then use Vector > Rasterize selected Vector entities
command to create the raster AC ROI in this layer.
26.4.2. Define Abdominal Cavity ROI using Paintbrush
The Abdominal Cavity ROI can also be created using the
Paintbrush and ROI tools.
Some users may prefer this method to using MagTrace.
Create a new layer (Layer Control > New ROI 3D) and rename it
Abdominal Cavity. Activate the Paintbrush tool by holding down Ctrl key
and the left mouse and draw a rough contour around the abdominal organs.
The outside boundary of this contour must follow the AC boundary. The
shape of the inside boundary does not matter. Once the contour is
completed, release the Ctrl key and mouse button. Make corrections using
the Paintbrush and Eraser (Ctrl + right mouse button). Next, on the main
menu, select ROI > Fill 2D Contours.
This command fills the inside of the contour and completes the AC ROI.
This ROI can be then used to perform segmentation with
Segment Abdominal fat using Abdominal Cavity ROI (current slice)
in the same fashion as the ROI created using MagTrace.
To define the AC ROI for 3D segmentation, the user may use the Paintbrush
to draw the perimeter of the ROI skipping several slices (e.g., on every
5th slice) on every 5th slice and then use ROI > Morphology >
Fill 2D Contours and Morph Convex
to complete the AC ROI.
Fig. 26.8 SAT and VAT segmented with abdominal cavity ROI.
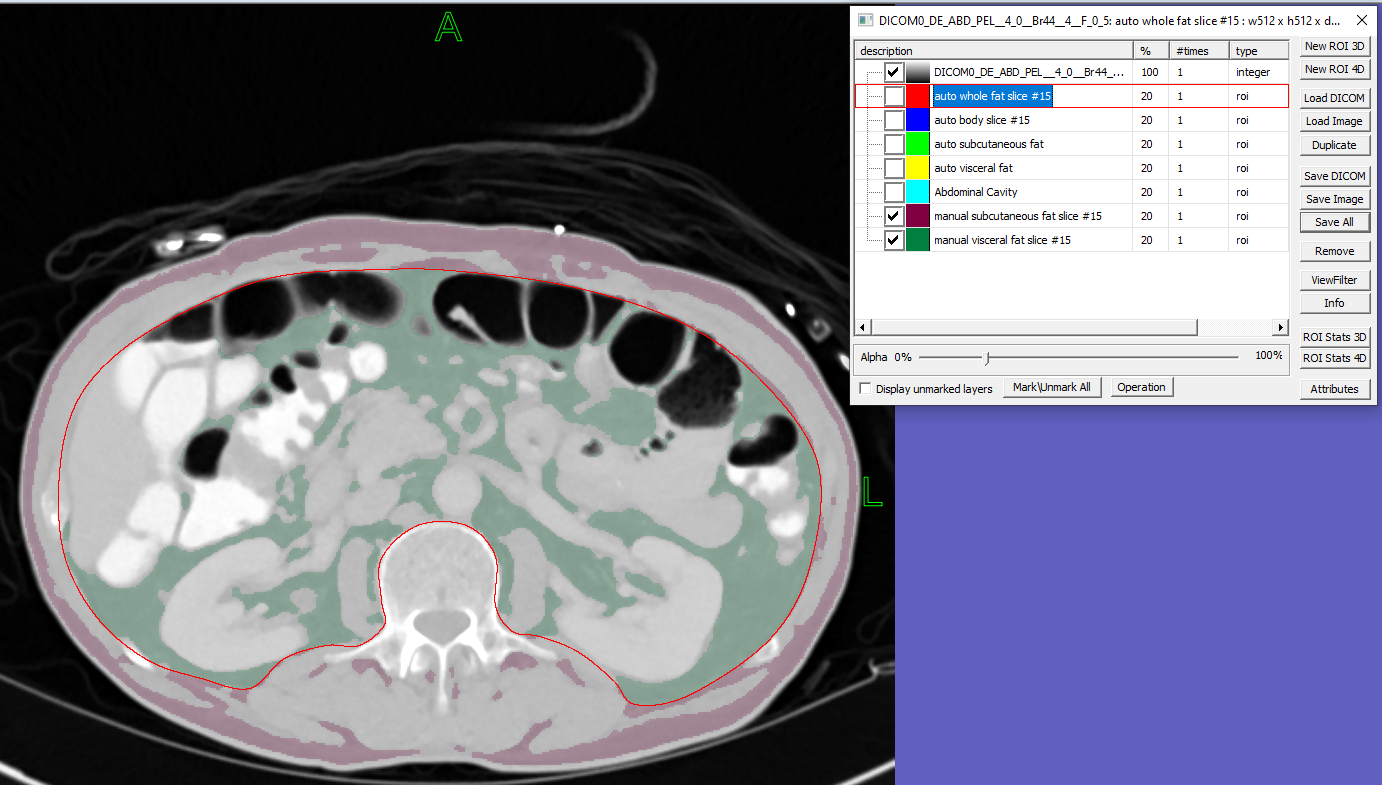
26.4.3. Segment subcutaneous and visceral fat using AC ROI
Check the boxes next to the base image, auto whole fat slice,
and Abdominal Cavity layers to make them visible.
Uncheck all other layers.
Select Workflows > CT Abdominal Fat Segmentation > Segment
Abdominal fat using Abdominal Cavity ROI (current slice). This command
creates two new ROI layers (Fig. 26.8):
manual subcutaneous fat slice #[number],
manual visceral fat slice #[number].
26.5. Measure VAT/(SAT+VAT) ratio (current slice)
This step allows the user to measure the volumes of visceral and
subcutaneous fat compartments (in cm3) and
the visceral fat fraction VAT/(SAT+VAT).
This step will return the measurements for all segmentation layers
present in the document, both automatic and manual, visible or invisible.
On the main menu, select Workflows > CT Abdominal Fat
Segmentation > Measure VAT/(SAT+VAT) ratio (current slice).
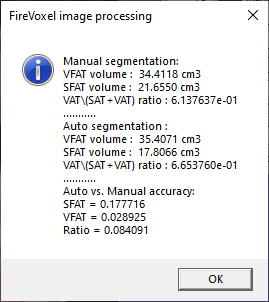
This opens a dialog displaying the results: VAT volume (cm3),
SAT volume (cm3), and VAT/(SAT+VAT) ratio.
If both automatic and manual segmentation ROIs are present in the document,
the SAT, VAT and VAT fraction are returned for each segmentation type
(Fig. 26.9).
In addition, the relative difference between the automatic and manual
segmentation is also shown for the volumes and the ratio: |auto - manual|/manual.
If layers from only one segmentation type (manual or automatic) are present,
the results are shown only for that type.
To copy these results to clipboard, click on the dialog box and
press Ctrl+C, then press Ctrl+V to paste the results into another
application.
The volumes of each layer in voxels and cubic centimeters can also be
obtained by activating the corresponding layer and using
ROI Stats 3D
command on Layer Control.
26.6. Single Slice 2D: Segment SAT, VAT, MAT and Muscle using Abdominal Cavity contour (MagTrace)
This step automatically segments muscle and intramuscular fat in
addition to the subcutaneous and visceral fat using the Abdominal Cavity
contour (rather than raster AC ROI layer).
Check the boxes for base image and auto whole fat slice
#[number]. Make sure that the AC vector contour is present.
On the main menu, select Workflows > CT Abdominal Fat Segmentation>
Single Slice 2D: Segment SAT, VAT, MAT and Muscle using Abdominal Cavity contour
(MagTrace). This opens the CT Fat Segmentation dialog (Fig. 26.3).
Click OK to accept the defaults.
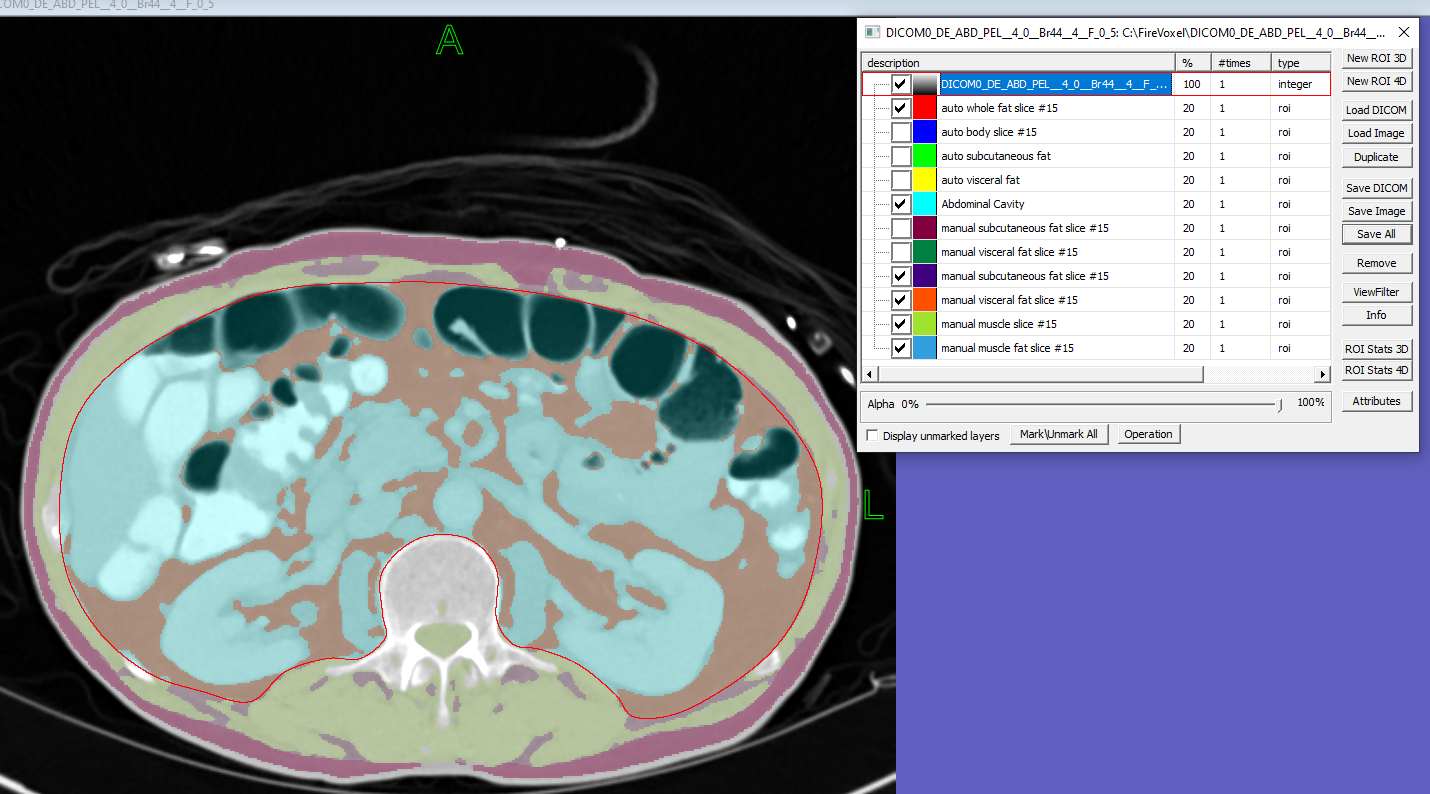
This commands creates four new ROI layers (Fig. 26.10):
manual subcutaneous fat slice #[number],
manual visceral fat slice #[number],
manual muscle slice #[number],
manual muscle fat slice #[number].
Fig. 26.10 SAT, VAT, MAT and muscle segmentation.
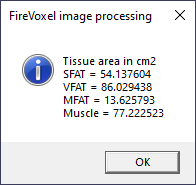
This command will also show a dialog with the area measurements
(in cm2) for SAT, VAT, MAT and muscle compartments
(Fig. 26.11).
To copy these results to clipboard, click on the dialog box and press Ctrl+C,
then press Ctrl+V to paste the results into another application. Then click OK
to close the results box.
These results can also be retrieved using
Measure SAT, VAT, MAT and Muscle
command described next. The volumes of each ROI can also be obtained
by activating each layer, opening Layer Control and using ROI Stats 3D.
Check the boxes for the base image, manual subcutaneous fat slice
#xx, manual visceral fat slice #xx, manual muscle slice #xx,
manual muscle fat slice #xx.
Select Workflows > CT Abdominal Fat Segmentation > Measure
{SAT, VAT, MAT and Muscle}. The information dialog with the area
measurements (in cm2) of SAT, VAT, MAT and muscle
will be displayed, as in the previous step (Fig. 26.11).
These results can be copied to clipboard (Ctrl+C) and pasted elsewhere
(Ctrl+V).
Note that this command returns the ROI areas rather than their volumes,
in contrast to Measure VAT/(SAT+VAT command).