This chapter describes commands for loading images and data
into FireVoxel grouped under the main menu’s File tab.
Commands for preliminary processing of DICOM files
(such as de-identification and sorting DICOM tree by folders)
are described in De-identification and DICOM Operations.
Open automatically all FireVoxel documents in a folder.
This command is available when no images are open in FireVoxel
and is used mainly for batch processing.
Opens browse-for-file dialog to select a file in one of the image formats
including Midas (*.im), ANALYZE (*.img), NIfTI (*.nii, *.nia, *.nii.gz),
FreeSurfer (*.mgh, *.mgz), or RAW 4D (*.time).
The selected image is opened in a new document window.
Opens browse for file dialog to load a .txt file. After the file is
selected, TAC Volume attributes dialog is opened with the boxes
for width, height, depth, and noise level (%). After the user clicks OK,
the next dialog offers a choice of modality: MR, CT, PET, or US.
Next, the result is displayed in a new document window.
The Open DICOM (Single Document or Multiple Documents) commands
open browse-for-folder dialog to select a directory with DICOM images.
The directory may contain multiple subdirectories.
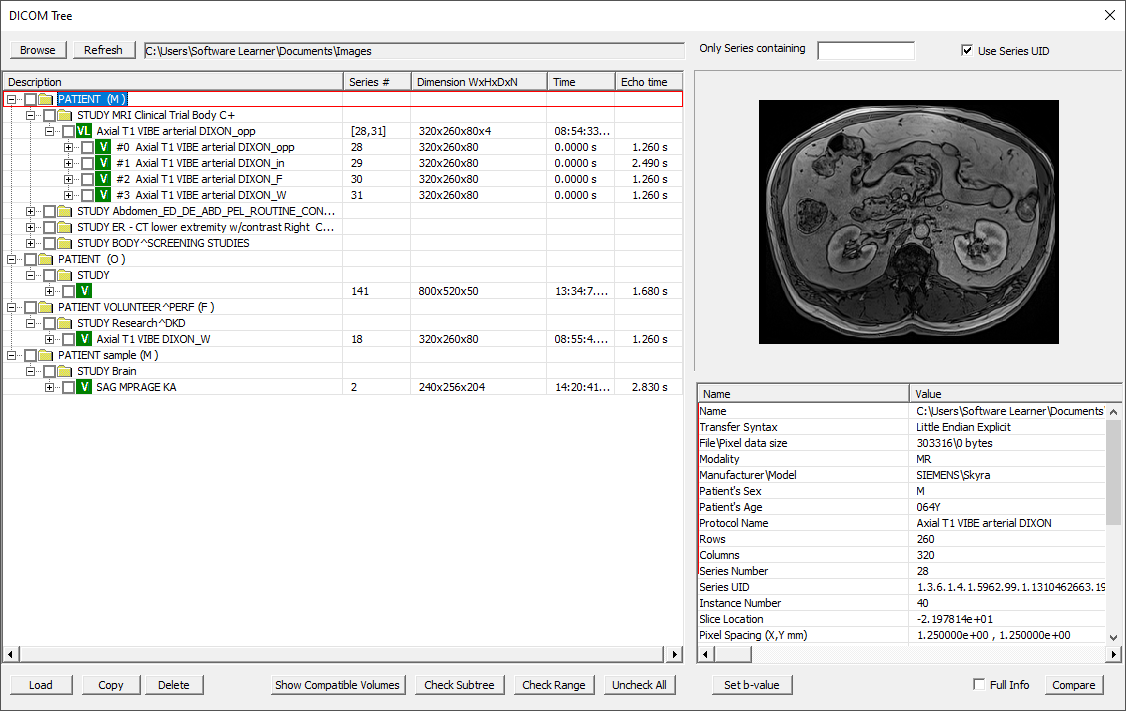
Once the user selects the directory, FireVoxel opens the DICOM Tree dialog
(Fig. 6.1).
The DICOM Tree dialog shows images organized by
PATIENT (), STUDY (), and SERIES.
SERIES may be one of four types (each labeled with a corresponding icon):
S (slice, ) - A series of 2D images;
SL (slice list, ) - A dynamic series of slices;
V (volume, ) - A 3D image;
VL (volume list, ) - A dynamic series of volumes.
Fig. 6.1 DICOM Tree dialog allows the user to examine, preview and select images.
User may mark entries in the DICOM Tree by checking or selecting them.
To check, check the box next to Series or Image name to select one or several entries.
To select, click the Series or Image name, and the selected object will be highlighted
with a red box, one at a time. By default, when the DICOM Tree is opened, the entire
Series is selected.
The DICOM Tree dialog contains the following parts:
[Select images to load]:
Browse - Browse for folder to select a DICOM directory.
Refresh - Reload the directory displayed in Current Directory box.
Current Directory - The contents of the directory displayed in the DICOM Tree.
Only series containing (filter) - Type keyword(s) to select only series
with names containing these keywords. To display filtered DICOM Tree results,
click Refresh. Example (Fig. 6.1): Entering VIBE will select
series titled Axial T1 VIBE…, VIBE DIXON…, Perf VIBE…, etc.
To display the full DICOM Tree, delete the keywords and click Refresh again.
Use Series UID - Toggles on/off using series unique identifier for sorting
((0020,000E) Series Instance UID).
Series Instance UID is a non-human-readable identifier that
“guarantee[s] uniqueness” of all instances of this Series
and distinguishes them from all other series, “across multiple countries,
sites, vendors and equipment.” Each UID consists of two parts an <org root>
and a <suffix>: UID = <org root>.<suffix>. The <org root> “1.2.840.10008”
is reserved for DICOM defined items.
See more on UIDs at DICOM Part 5, Chapter 9: Unique Identifiers.
Description – PATIENT/STUDY/Series title, series
number, dimensions (width (W) x height (H) x depth (D) x N
(dynamic dimension)), image time (start and end), and echo time.
The series number for SL and VL shows the numbers of the first
and last series of the list: [First, Last].
The width (W) and height (H) are the in-plane image dimensions in voxels.
The depth (D) is the number of slices (D=1 for S and SL).
The dynamic dimension N is provided for slice lists (SL) and volume lists (VL).
For example, for dynamic contrast-enhanced MRI, N would represent the number
of time points; for diffusion-weighted MRI, N would stand for the number
of b-values, etc.
[Preview window] [top right] – Displays selected image
(or the default image if Series is selected).
[Header information] [bottom right] – Displays selected DICOM header
information (by default), or full info (if Full Info box is checked).
Full Info – Checkbox to toggle on/off between displaying full DICOM header
information when checked, or only selected fields when unchecked (default).
The on/off selection does not affect the information used by Compare command.
Compare – Enables comparison of DICOM headers of two checked images
(2D images, not volumes). Opens a text file (default: Notepad) with a list
of pairs of DICOM fields that differ between the two images.
Actions – Load / Copy / Delete / Show Compatible Volumes / Check
Subtree / Check Range / Uncheck All / Set b-value / (x, Cancel Open).
Load – Load series and display in a new document window.
Note: Layer Control > Load DICOM enables loading DICOM images
as new layers in an existing document window. The matrix and voxel size
of the loaded images must be the same as those in the original document window.
Copy – Open browse for folder dialog to copy marked series or
images to the selected folder.
Delete – Delete marked images from the DICOM directory. The command has
a failsafe dialog (Some images will be deleted). NOTE: When the user
clicks Yes, the images are permanently deleted from the source folder.
Select No if in doubt.
Show Compatible Volumes – Shows only volumes with the same dimensions
and resolution as the selected image. These images can be opened in the same
document window.
Check Subtree – Checks boxes next to all entries on a level below
the selected/current entry (i.e., if a PATIENT is selected,
all STUDIES grouped under this PATIENT will be checked;
if a STUDY is selected, all VL (volume lists) under this study
will be checked, etc.).
Check Range – Enables checking boxes for a range of entries under
the currently selected entry (i.e., a range of STUDIES under PATIENT,
or a range of SLICES under VOLUME). Opens dialog (Specify descendant range
in [range] to enter Range start and Range end indices between which
the boxes will be checked. Indices start at zero (first entry has index=0).
Uncheck All – Uncheck all entries.
Set b-value - Opens dialog (Specify b-value (sec/mm^2)) to enter
a b-value for the marked diffusion-weighted MR image. Populates DICOM field
(0018,9087) DiffusionBValue with the user-entered value.
See Diffusion b-value Attribute: (0018,9087).
This option is needed to enter the b-values manually when they cannot be
automatically read from the DICOM headers. The b-values may also be stored
in private fields, such as (0019,100C) for Siemens images.
NOTE: The b-value header field is modified once the user clicks OK on the dialog.
Even if the user then cancels loading images, their DICOM headers will retain
the user-entered b-values.
Opens browse-for-folder dialog to select a directory with DICOM
images. Once the user selects the directory, the command opens
DICOM Tree dialog, showing the structure of exams in this directory.
The directory may contain multiple subdirectories,
with images from different patients, exams, modalities, etc.
FireVoxel will infer the DICOM Tree structure from the DICOM headers,
as long as these headers can be correctly interpreted by the software.
The user then selects images (studies, series, or individual images)
to be loaded and displayed in a single document window.
After the user clicks Load, the DICOM Tree dialog is closed,
and the images are loaded and displayed in a document window.
Only images with compatible parameters (the same width, height,
and depth dimensions and resolution) can be loaded in the same
document window. If the selected images have incompatible parameters,
an error message is shown and loading images is canceled
(Selected SERIES depth differ > Loading DICOM Failed).
To select multiple image series with disparate parameters and
open them in different document windows, use the next command
(Open DICOM folder: Multiple Documents).
If your images are not displayed correctly, please report this issue
to the FireVoxel team. Problems with image loading sometimes
arise from the variations of the DICOM format among imaging platforms.
In many cases, these issues can be fixed promptly, especially if the user
provides the developers with sample images (preferably de-identified).
This command enables opening several image series, each in its own
document window, from the DICOM Tree, without the need to use
Open DICOM folder: Single Document multiple times.
Opens browse-for-folder dialog and allows the user to select
a DICOM directory. Once the directory is selected, opens the DICOM Tree
dialog. The user selects images (studies, series, etc.) and clicks Load.
Selected images are displayed in a new document window
(provided images have compatible dimensions).
After the images are loaded, the DICOM Tree dialog remains open.
The user may select more images and click Load again.
These new images are displayed in another document window.
The user may repeat selecting images and loading them multiple times,
each time creating a new document window.
See View for how to adjust the way the images are
displayed and how to navigate through different slices and dynamic frames.
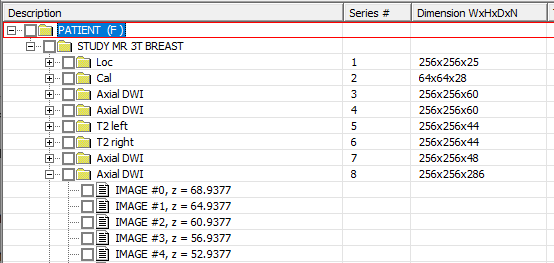
Custom option for select users (mainly on GE platform).
Opens browse-for-folder dialog to select a DICOM directory.
Displays simplified DICOM Tree dialog showing sorting as
PATIENT > STUDY > SERIES > IMAGE (Fig. 6.2).
Fig. 6.2 DICOM > Open selected SERIES opens simplified DICOM Tree.
Allows the user to select specific image series and load it
in a document window. Open selected SERIES does NOT form high-level
3D and 4D entities, as is done by File > Open DICOM folder command
(Fig. 6.3).
Fig. 6.3 Open DICOM folder opens full-feature DICOM Tree.
CT images in DICOM format may be opened in FireVoxel as real-valued volumes
with voxel values expressed in CT numbers (Hounsfield units (HU)) or
as integer grayscale volumes.
When the user selects the images in the DICOM Tree and clicks Load,
FireVoxel determines the initial import settings based on the DICOM header data.
If the selected series includes CT images, the user will be prompted to choose
the value conversion option
(Load Volume value conversion dialog, Fig. 6.4)
between loading the images directly, without converstion (in HU)
or after conversion to grayscale intensity values.
If the user selects the option to Load as Real Valued Volume
(upper radio button in the dialog in Fig. 6.4),
the images are loaded as CT numbers (HU). In this case, voxel values
may take both positive and negative real values that are displayed
as a color map.
Fig. 6.4 The Load Volume value conversion dialog by default offers conversion
from HU to grayscale values.
The default option is set to Load as Unsigned Integer Volume (lower radio button
in Fig. 6.4). In this case, FireVoxel converts the original CT
voxel data expressed in HU (Voxel_HU) into non-negative integer intensity values
(Voxel_Intensity) according to the rule:
Voxel_Intensity = Voxel_HU x multiplier + offset.
FireVoxel determines the default multiplier (Multiply by) and offset (Add)
from the following DICOM header fields:
(0028,1052) Rescale Intercept – The air value corresponding to zero intensity
(typically -1000 HU or -1024 HU, depending on the hardware manufacturer);
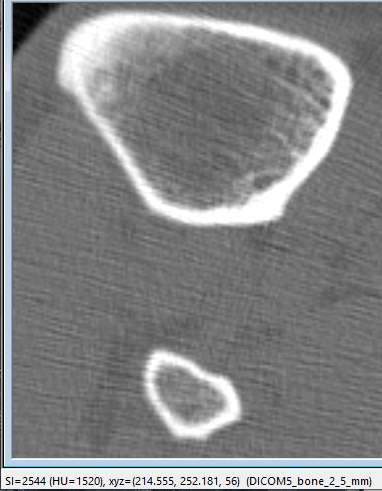
For converted images, FireVoxel displays both the signal intensity (SI)
and the HU values at the current cursor position in the status bar
in the lower left corner of the software window
(Fig. 6.5).
Fig. 6.5 Status bar shows voxel signal intensity (SI) and CT Hounsfield units
(HU) in dense bone.
The lower portion of the File menu contains a list of recently
saved documents and images. Selecting files from this list allows
the user to quickly reopen these files. If a file has been moved
or deleted, a warning is shown that the file cannot be found.
 ), STUDY (
 ), and SERIES.
 ) - A series of 2D images;
 ) - A dynamic series of slices;
 ) - A 3D image;
 ) - A dynamic series of volumes.