Coregistration aligns two images of different dimensions,
orientations, and imaging modalities (e.g., CT and MRI).
During coregistration, one image, which we will call the source image,
is transformed and superimposed onto a fixed image called
the target image, which remains unchanged.
Register > Using Orientation\Position tags is FireVoxel’s basic
coregistration command that uses DICOM orientation and position attributes
and matrix algebra to align the source image with the target.
This method works best for 3D images acquired during the same imaging session.
The patient position is assumed to be unchanged between the two acquisitions.
The source and target images may have different matrix, field of view,
and orientation. This method is fast, convenient, and requires no parameters
to be adjusted.
Requires two 3D images in DICOM format: source and target.
May also work for NIfTI images that unambiguously store the image orientation
information. This method does not work for ANALYZE and similar image formats
that do not store the orientation data.
The source document, besides the acquired image, may also contain other layers,
including segmentation masks (ROI layers) and parameter maps.
All these layers will be coregistered together with the base image.
Returns coregistered image, with the same matrix dimensions and resolution
as the target image. The coregistered layer will be named after the source image
with a suffix added (_reg). The coregistered image is placed either
in an automatically created new layer or a new document window, depending
on the user choice.
Any ROI layers present in the source window (and containing the same DICOM tags
as the source image) will also be coregistered together with the source image.
To use:
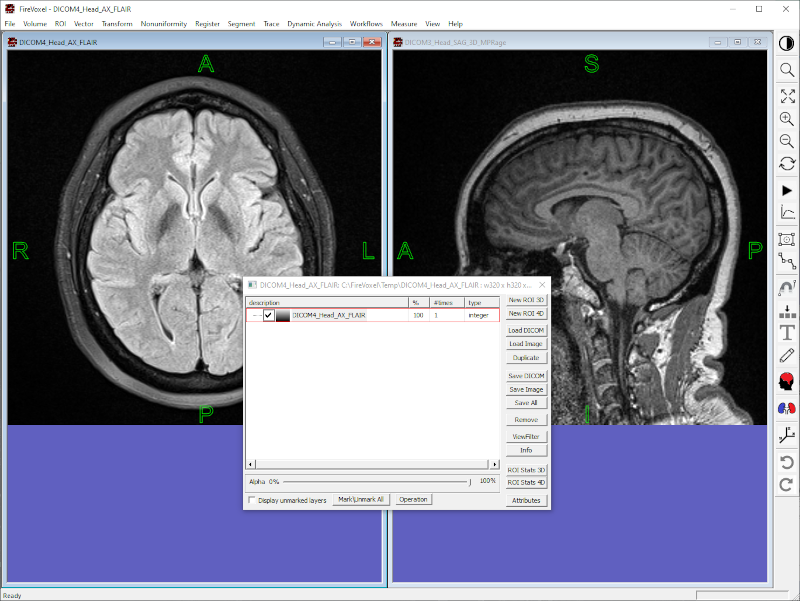
1. Open the source image in FireVoxel. The source image will be displayed
in a new document window. If the source document contains multiple layers, make sure
that the base layer (acquired image, MRI, CT, PET, etc.) is the active layer.
2. Open the target image in target document window. Make sure that the target window
is the active window by clicking on it. The active window is indicated by the blue
title bar. Also make sure that the base image is the active layer
(Fig. 21.1).
Fig. 21.1 Target (left, active) and source (right) images.
3. Select Register > Using Orientation Position tags on the main menu.
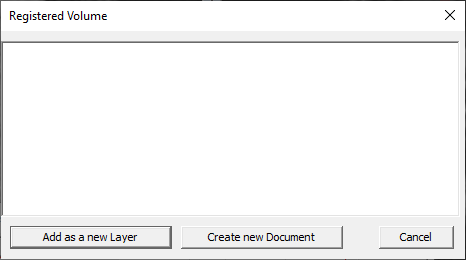
4. A dialog opens showing the output options (Fig. 21.2).
Select an option to start processing or cancel:
Add as a new layer – Coregistered image is added to the target window as
a new (topmost) layer;
Create new Document – Coregistered image is displayed in a new document window;
Cancel – Cancel the operation.
Fig. 21.2 Output options for coregistration with DICOM tags.
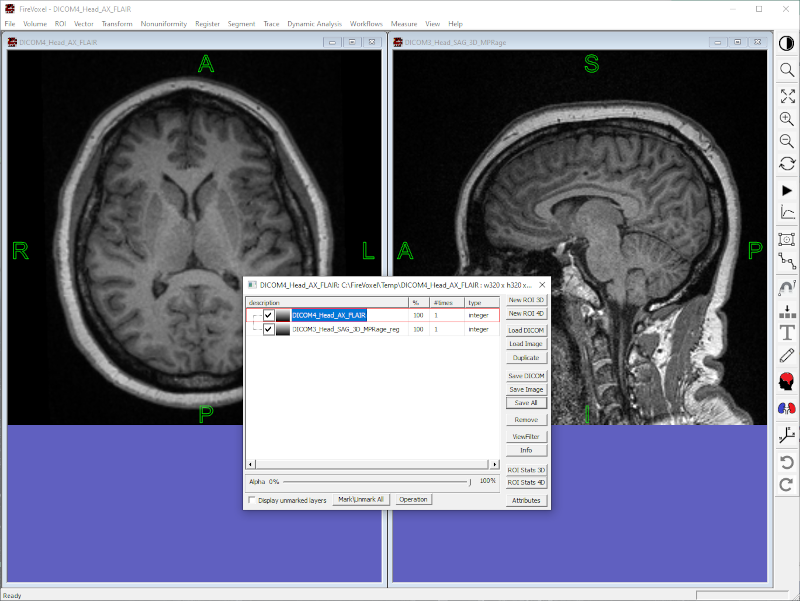
5. After registration is completed, the coregistered image will be displayed according
to the selected option: (a) in a new layer or (b) in a new document window. The new
layer or document is labeled [source]_reg. All layers of the source document will be
coregistered together and placed either into the target window or into
the new document window.
Fig. 21.3 Coregistered image in a new layer (left) in target window.
6. Check the accuracy of registration. Open Layer Control
and use the Alpha slider to adjust the layer transparency
to inspect the coregistered image.
7. If coregistration accuracy is unacceptable, try a more advanced coregistration
method, such as Register > Coregister with AutoFocus.