Region of interest (ROI) is a binary layer, or mask, in which each voxel
takes values 1 or 0. ROI voxels that have the value of 1 have attributes
of foreground color and transparency (alpha value). Voxels that have
the value of 0 are always completely transparent, regardless of the
transparency value of the entire ROI layer. In FireVoxel, ROI layers are
treated as 3D or 4D raster images.
Raster ROIs may be created manually or as a result of various commands.
Raster ROIs can be drawn manually using the paintbrush tool. Drawing is
done on the active ROI layer. If there are no visible ROI layers (i.e.,
the document has ROI layers, but they are unmarked), a new ROI layer is
created by default and the ROI is drawn on that layer. The ROI layer has
the same matrix dimensions and voxel size as the underlying base image.
Fig. 12.1 Paintbrush tool for drawing and editing raster ROIs.
To draw an ROI, press and hold down Ctrl key and click and hold down the
left mouse button. The cursor turns into the paintbrush, shown
as a green ring filled with the ROI color at 20% transparency.
Move the mouse to paint voxels that need to be included in the ROI.
Any voxels touched by the paintbrush (the green circle) will be painted
the ROI color (i.e., assigned the values of 1). To finish drawing, release
the mouse button and Ctrl key (Fig. 12.1).
To erase voxels from an ROI, hold down Ctrl key and click and hold down
the right mouse button. The cursor turns into a red ring (without
color inside), the eraser brush. Move the cursor to erase voxels. Any
voxels touched by the eraser will be returned to zero state and become
transparent. Release the mouse button (and Ctrl key) to finish.
Manually drawn ROIs do not need to be contiguous and may contain areas
drawn on several different slices.
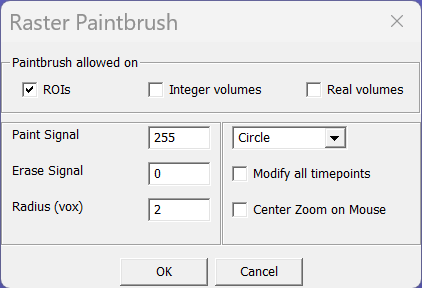
The paintbrush properties dialog (Fig. 12.2)
can be accessed by clicking
icon on the main toolbar. The panel must be closed before the paintbrush
can be used. The paintbrush settings are retained for one session.
Closing and reopening FireVoxel restores the default settings.
Paintbrush allowed on ROIs/Integer volumes/Real volumes – The three checkboxes
at the top of the dialog control the types of layers the paintbrush is allowed to change.
By default, the paintbrush is allowed to draw only on ROI layers. If the Integer volumes
box is checked, the paintbrush can draw on image layers. Similarly, if the Real volumes
box is checked, the paintbrush is able to draw on real-valued layers, such as parametric maps.
NOTE: Selecting Integer volumes and/or Real volumes allows the paintbrush to alter
the base images, which is often undesirable. Therefore, users should exercise caution
when using these options.
Paint Signal/Erase Signal – These text boxes control the grayscale value
of the paintbrush/eraser, respectively. This option can be used for drawing on integer
or real layers. It does not affect the paintbrush on ROI layers. By default, the paintbrush
grayscale value is set to white (Paint Signal = 255) and the eraser value to black
(Erase Signal = 0). Changing the Paint Signal/Erase Signal settings by entering new
values into the corresponding text boxes allows painting and erasing voxels with other
grayscale values.
Radius (vox) – This text box sets the radius of the paintbrush to a specified value
(default, 2 voxels). This allows the user to control the paintbrush/eraser size more
precisely than when adjusting it by scrolling the mouse wheel. Entering the radius of 0
sets the paintbrush size equal to 1 voxel. If the paintbrush radius is set to 1 voxel
(in Circle mode, see below), the paintbrush has the shape of a 5-voxel cross
(as on the Swiss flag).
Circle/Sphere/Cylinder – The dropdown menu allows the user to select among the three different
paintbrush types. By default, the paintbrush is set to Circle, and in this regime it paints
all voxels within a given radius from the brush center on a single plane (2D). The Sphere option
enables drawing an ROI on several slices (3D) at once: this paintbrush paints all voxels within
the selected radius from the paintbrush center in three orthogonal directions. The Cylinder
option replicates an ROI drawn in one plane throughout all voxels in the direction orthogonal
to the plane of the original ROI.
Modify all timepoints – This checkbox, if checked, extends the ROI to all frames
in a dynamic (4D) experiment. This results in a 4D ROI. The box is unchecked by default.
Center Zoom on Mouse – This box is unchecked by default. This option has effect
only when an image is viewed using Zoom by Window.
When enabled, this feature automatically shifts the view within the document window
to center on the current cursor position. This allows the user to control the ROI drawing
with the paintbrush more precisely. To use this option, first select View > Zoom by Window
from the main menu, or click the icon on the toolbar (the cursor will become
a magnifying glass) and select the zoom-in area. Next, start painting with the paintbrush
by holding down the left mouse button. As the mouse moves, the document window view will
shift as well, so that the cursor remains in the center of the window.