Several DICOM operations are available under File > DICOM (command group).
These commands include tools for de-identification (anonymization) of DICOM images,
as well as commands for manipulating DICOM files and folders.
The selection of available DICOM commands depends on whether any images are open
in FireVoxel. Some commands are always accessible and other commands are available
only with or without images open.
Patient privacy rules and research regulations often require that research
data be de-identified (anonymized). FireVoxel offers its users broad discretion
over de-identification of images. Users are able to customize the de-identification
options according to their local privacy regulations, research needs, and processing
tasks, which may dictate what information is considered sensitive and how strict
the anonymization should be.
Caution!
Users of FireVoxel are responsible for complying with the local patient privacy
laws when working with images that may contain identifying information.
The DICOM header fields that contain the information identifying
the subject, physician, operator, and imaging center
are usually considered Protected Health Information (PHI).
Image processing software packages typically offer de-identification commands,
but the list of sensitive DICOM fields (tags) removed by these commands varies
by software package (for a comparison of free de-identification tools, see
Aryanto 2015 PMID: 26037716).
In FireVoxel, de-identification is performed using commands under
File > DICOM:
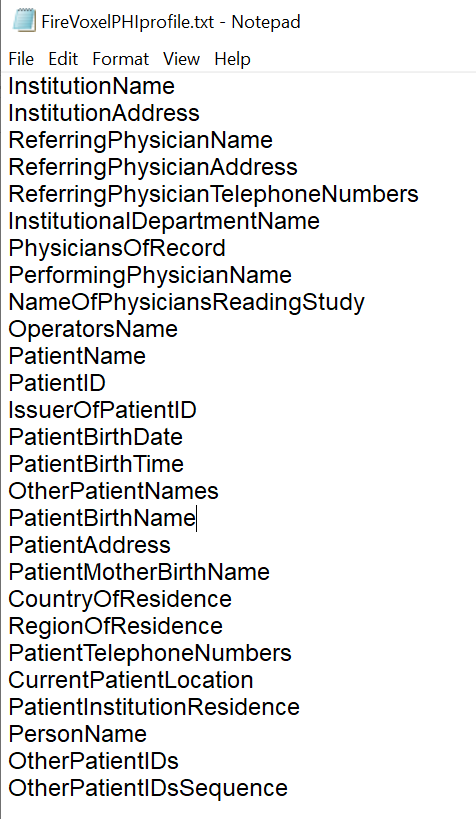
FireVoxel allows the user to customize de-identification through
the PHI profile, a list of header fields stored in a text file
named FireVoxelPHIprofile.txt (Fig. 7.1)
in the FireVoxel directory and used by the de-identification commands.
The default FireVoxel PHI profile contains only the most important identifiers
listed in order of their field codes (i.e., 0008,0080; 0008,0081; 0008,0090;…).
For a complete list of DICOM fields and their descriptions, see
DICOM Standard Browser.
The user may customize this PHI profile by editing FireVoxelPHIProfile.txt,
adding or removing DICOM fields, and then saving these changes.
Each field name must be placed in a separate line.
The order of the fields does not matter.
The new PHI profile takes effect when FireVoxel is started next time.
The user should keep a backup copy of the custom PHI profile,
because FireVoxelPHIProfile.txt will be overwritten when FireVoxel
is reinstalled or updated to a new build. To restore the default
PHI profile, the user may overwrite FireVoxelPHIProfile.txt with the list
of tags shown in the sidebar.
Note: The default PHI profile contains fields (0010,1002) OtherPatientIDs and
(0010,1000) RETIRED_OtherPatientIDs (in this form), because these fields are often
present in images commonly handled by the FireVoxel team. Users are advised to configure
the PHI profile to include these and/or other DICOM header fields relevant
to their applications and patient privacy requirements.
Deletes fields listed in FireVoxelPHIProfile.txt from all images
in the user-selected selected directory.
Opens browse-for-folder dialog to select a directory containing
DICOM images that need to be de-identified.
Once the user selects the directory, a failsafe dialog appears
and asks the user to confirm the operation:
All DICOM files in [selected directory] will be overwritten. Proceed?
If the user clicks Yes, the files in the selected directory will be
replaced with the de-identified files named image_00, image_01, etc.
with fields listed in FireVoxelPHIProfile.txt removed.
Once the operation is completed, an information dialog will report
the results: [number] out of [total number] of files were de-identified.
Time elapsed = [time] sec.
Available only when images are open in FireVoxel and displayed
in a document window.
Removes DICOM fields listed in FireVoxelPHIProfile.txt from the images
displayed in the active document window. Opens a dialog showing the list
of PHI fields found in the active document (Protected Health Info is present,
Fig. 7.2).
The user may choose to De-identify or Cancel.
If the user selects De-identify, the PHI fields are deleted
only within the active document.
The source DICOM images (outside FireVoxel) are NOT de-identified.
Select Layer Control > Info to verify that the sensitive tags
are no longer present.
Fig. 7.2 De-identify document command opens PHI is Present dialog.
Available only when NO images or documents are open in FireVoxel.
Separates a multiframe DICOM image (3D or 4D) into individual frames and
writes the resulting image series into a user-selected target directory.
The images in the target directory may then be loaded into FireVoxel
using File > Open DICOM folder: Single Document.
Opens browse-for-file dialog to select a multiframe DICOM file (.dcm).
Once the user selects the file, the command opens a browse-for-folder dialog
to choose (or create) a target directory. The command then proceeds to split
the original image into individual frames, each slice as a separate DICOM file
(.dcm), and saves them in the target directory.
A multiframe image contains a sequential set of image frames, all with the same
dimensions and orientation, with a single header. This results in a more compact
representation than a regular, single-frame series, in which every image has its
own header. Multiframe images may be created, for example, by imaging systems that
produce output in the preclinical DICOM format.
Available only when NO images or documents are open in FireVoxel.
Opens browse-for-folder dialog and returns for the images in the selected
folder the sizes (in bytes):
- Total DICOM file size,
- Total DICOM Pixel Element file size.
The total DICOM file size is the sum of the sizes of individual images
in the series. The total DICOM pixel element file size is the image size
excluding the header. This information can be copied and pasted elsewhere
(using Ctrl+C, Ctrl+V).
Note:
Starting with build 369, the pixel element size of zero
is returned for uncompressed DICOM files. A non-zero size value
is returned for images saved in JPEG Lossless or JPEG-LS formats.
See also File > User Interface Options >
Compression.
The purpose of this command is to provide an estimate
of the relative sizes of the header and image pixel data.
Copies DICOM images from a user-selected directory, sorts them according
to the DICOM Tree structure by Patient, Study, and Series, and pastes copies
of these images into automatically created folders named Patient_N, Study_X, Series_Y.
The command opens a dialog panel with boxes for entering/selecting the Source Folder
and the Target Folder.
The Source Folder is the directory with the original, unsorted DICOM images.
The Target Folder is the location where the sorted images will be placed.
After the user specifies the Source and Target folders, a dialog appears:
“Include Patient Name as part of the folder name?”
If the user selects Yes, the top directory within the target folder will be named
PATIENT_[PatientNameFirst]_[PatientNameLast]_PatientSex_PatientBirthDate.
If the user selects not to include patient’s name, this directory is named
PATIENT_1. REVIEW
The next level directory (or directories) inside PATIENT_[…] will be labeled
STUDY_[StudyDescription]_[StudyDate] (after DICOM fields).
Still deeper level directories are named SERIES_MN_[SeriesDescription],
MN = 00, 01, 02…
Inside each SERIES directory, images are labeled image_00.dcm, image_01.dcm, etc.