White matter hyperintensities in the brain and spinal cord
are regions of high signal relative to healthy white matter (WM)
on T2-weighted fluid attenuated inversion recovery (FLAIR) MRI
(see T2-FLAIR at
MRI Questions and
Radiopaedia).
These white matter lesions (WML) are often found in patients with
multiple sclerosis and are also commonly seen in older individuals
(White Matter Lesions - NIH Bookshelf).
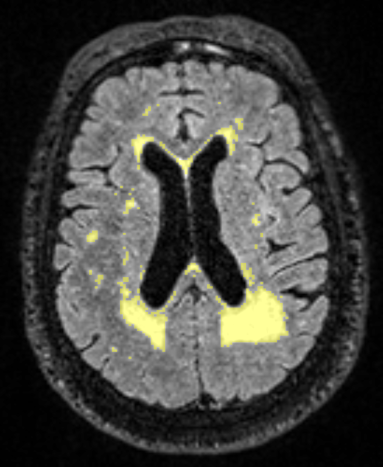
Detecting WML and measuring their size and location helps
to assess the extent of WM disease (Fig. 38.1).
The WML and ventricle segmentation masks may be used for classification
of WML as periventricular and deep lesions. It has been shown that periventricular
lesions are more strongly associated with cognitive decline, and therefore
knowing the location of WML in relation to the ventricles may help to characterize
the subject’s neurological status. Currently, the WML classification may be done
with the help of the 3D “bilateral distance” method
(Chen 2021 PMID: 33127308),
available as open-source software (GitHub: WMHS).
The implementation of this method in FireVoxel is under development.
The WML segmentation workflow includes the following steps:
Nonuniformity correction (optional).
Whole-brain segmentation using EdgeWave.
Lateral ventricle segmentation (with multi-pass EdgeWave and
advanced morphology operators).
White matter segmentation – WM is segmented by excluding gray matter (GM)
from the whole-brain mask. GM segmentation can be done by
using a previously created GM mask, or
loading the subject’s T1-weighted magnetization-prepared rapid gradient
echo (MPRAGE) image and using it to automatically segment GM, or
specifying the width of a uniform region to be excluded
from the outer edge of the whole-brain mask (using Peel command).
“Healthy” WM sampling – The signal is sampled in uniform, lesion-free WM
to determine its mean and standard deviation (mean_WM and stdev_WM,
respectively). Healthy WM signal may be sampled using one of two
available methods:
Using a WM seed (default) – The signal is sampled within a WM seed,
a small (1 mL) cubic vector ROI automatically created
in the most uniform area of WM.
Using the whole WM – The whole WM is sampled. It is assumed that WML
occupy a small volume compared to the whole WM and do not distort
the distribution of the WM signal.
Identifying WML candidates – WM voxels are marked as WML if their signal
exceeds threshold_WML = mean_WM + k x stdev_WM, where k is a user-selected
multiplier. This step results in a preliminary WML segmentation.
Filtering WML based on size and location – Cortical lesions and lesions
smaller than a user-specified minimum size are removed from
the preliminary segmentation. The final WML segmentation is created.
Returning segmentation results in new, automatically created layers.
Segmentation of a single FLAIR series takes the following input data:
FLAIR MRI (required) – 3D FLAIR MR image (usually in DICOM format).
Gray matter segmentation mask (optional) – The GM mask (ROI layer)
must be created beforehand using FireVoxel or another software tool
(such as FreeSurfer or
SPM),
coregistered with FLAIR image, and placed as a layer into the same document
as FLAIR MRI. This layer should be named gray matter or GM (case insensitive).
MPRAGE MRI (optional) – T1-weighted 3D MPRAGE MR image
(usually in DICOM or NIfTI format).
This MPRAGE image must be opened in a separate document window
within the same instance of FireVoxel as FLAIR. This is an alternative
method to perform GM segmentation within the same command as WML
segmentation. If both MPRAGE and GM mask are present, GM mask is used.
To segment one FLAIR series at a time, first, prepare input data.
Open FLAIR image in FireVoxel and, optionally, load GM mask into
the same document window or open MPRAGE image in another document window.
Make sure that FLAIR image is the active layer.
Next, select Workflows > Brain MR > White Matter FLAIR Lesions.
This will open WML dialog described below. Enter the parameters, or accept defaults,
and click OK. The command will run automatically and return outputs described
in WML Segmentation Output.
Both individual and batch commands use the same dialog:
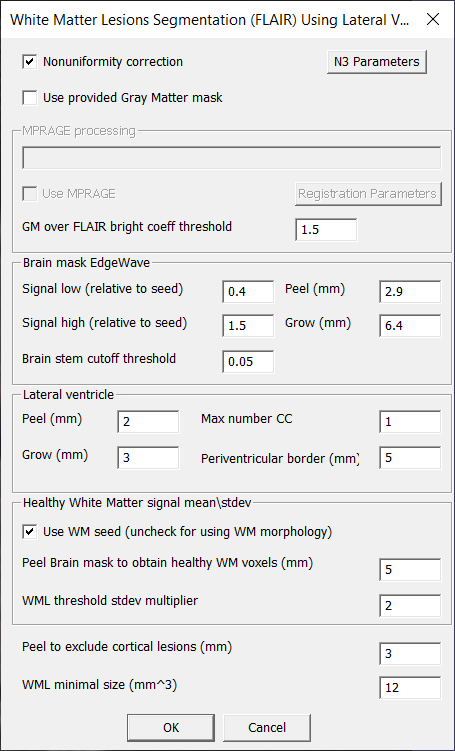
White Matter Lesions Segmentation (FLAIR) Using Lateral Ventricle
(Fig. 38.2).
Fig. 38.2 White Matter Lesions Segmentation dialog with default parameters.
The dialog panel contains blocks that closely match the workflow steps
described in Overview:
Nonuniformity correction
Gray matter (GM) segmentation
MPRAGE processing
Brain mask EdgeWave
Lateral ventricle
Healthy White Matter signal meanstdev
[WML selection by size and location]
Nonuniformity correction – Parameter: DoN3 (default: 1/checked); –
When checked, the N3 nonuniformity correction is performed
prior to WML segmentation. Using nonuniformity correction is recommended,
as it may considerably reduce the number of false positives,
especially in deeper regions of the brain.
N3 Parameters (button) – Opens N3 dialog
to configure the nonuniformity correction parameters.
Use provided Gray Matter mask – Parameter: UseProvidedGMmask (default: 0/unchecked)
– Check this box to use a previously created
GM segmentation mask (see WML Input Data).
MPRAGE processing – This block is activated when
MPRAGE image series is detected in another document window. In this case,
MPRAGE can be used to create a GM mask. When MPRAGE is present, the name
of the MPRAGE image series is displayed in the text box below the section title.
The user must then check the box labeled Use MPRAGE and configure coregistration
of MPRAGE to FLAIR. If Nonuniformity correction is checked, the correction
is also applied to MPRAGE. If both MPRAGE and GM mask are present
(and Use provided Gray Matter mask is checked), the algorithm
uses the GM mask and ignores MPRAGE.
Use MPRAGE – Parameter: UseMprage (default: 0/unchecked) –
This button becomes available if MPRAGE is detected and when checked,
MPRAGE image is coregistered with FLAIR and used to segment GM. The GM mask
is created using the bimodal Gauss histogram thresholding with mass ratio constraint
(Mikheev and Rusinek, ISMRM 2023, Abstract #3602).
The parameters of MPRAGE/FLAIR coregistration can be configured by clicking
Registration Parameters (see next).
Registration Parameters (button) – Opens the image coregistration dialog
(3D Registration with AutoFocus). The dialog enables the user to set up
the coregistration parameters of MPRAGE (source) to FLAIR (target).
If both image series were acquired during the same exam, the best option
for the initial transform is clicking Dicom Tags.
This command creates a volume transform file DicomTags.vtf in FireVoxel’s
Temp directory with the dimensions and resolution of the source (MPRAGE)
and target (FLAIR) images and the affine transform matrix computed based
on the orientation and position DICOM fields of these files
(Fig. 38.3). This transformation is then used for
the initial coregistration.
GM over FLAIR bright coeff threshold – Parameter: GMbrightThrKoff (default: 1.5) –
Coefficient setting the upper threshold GM signal relative to FLAIR signal.
The brightest voxels on FLAIR are excluded from the GM mask.
Fig. 38.3 A volume transform file for MPRAGE to FLAIR coregistration
based on DICOM tags.
This block contains parameters of the whole brain segmentation of FLAIR image using EdgeWave
(see Segmentation with EdgeWave). A WM seed (WMS, a 1-mL cube)
is automatically constructed. The EdgeWave algorithm is applied with WMS.
Note: The whole-brain mask resulting from this step does not include CSF-filled spaces.
Signal low (relative to seed) – Parameter: BmCoreSiLo (default: 0.4) –
Lower threshold for signal intensity of the whole brain as a fraction of the mean WM signal.
Brain mask EdgeWave signal high (relative to seed) – Parameter: BmCoreSiHi (default: 1.5) –
Upper threshold of brain signal relative to the average WM signal.
Peel (mm) – Parameter: BmPeel (default: 2.9 mm) – Whole-brain Peel distance –
The thickness of the region to be removed by the Peel command.
Grow (mm) – Parameter: BmGrow (default: 6.4 mm) – Whole-brain Grow distance –
The thickness of the region to be added by the Grow command.
Brain stem cutoff threshold – Parameter: StemWeightThr (default: 0.05) –
Signal threshold for excluding the brainstem.
This block sets the parameters of the lateral ventricle segmentation.
Peel (mm) – Parameter: VentPeel (default: 2 mm) – Ventricle Peel distance
– The width to be removed by the Peel command during ventricle segmentation.
Grow (mm) – Parameter: VentGrow (default: 3 mm) – Ventricle Grow distance –
The width to be added by the Grow command during ventricle segmentation.
Max number CC – Parameter: VentMaxCC (default: 1) – Maximum number of connected
components in the ventricle mask.
Periventricular border (mm) – Parameter: VentInfl (default: 5 mm) –
The width to be added around the edge of the ventricle mask by Grow command to ensure
that no GM is detected in this inflated mask.
This block sets up the WM segmentation and the signal threshold used to identify WML.
Use WM seed (uncheck for using WM morphology) –
Parameter: UseWMseedForNormalVoxelsCheckbox (default: 0/unchecked) –
When this box is checked, the signal mean and stdev within the WM seed are used to determine
the threshold for WML segmentation. The seed is then deleted, so the user never sees it.
If the Use WM seed box is unchecked, the whole WM is used to determine
signal mean and stdev. See this Important Note
on selecting the multiplier for thresholding when using WM seed or whole WM.
Peel Brain mask to obtain healthy WM voxels (mm) – Parameter: WMdeflateToNormal
(default: 5 mm) – The thickness of the region between the outer edge of the brain mask
and the edge of healthy WM to be excluded from the whole brain mask by the Peel command.
WML threshold stdev multiplier – Parameter: WMLThresholdStddevMult (default: 2.0)
– As described in Overview, the algorithm looks for WML voxels with
signal above threshold_WML = mean_WM + multiplier x stdev_WM.
Larger multiplier values result in fewer and smaller lesions being found.
Important Note: A higher value of the multiplier is needed when
using the WM seed option compared to the no-seed (whole WM) option
to reduce the number of false positives, which may arise if the WM seed
is hypointense and uniform compared to the rest of WM.
The last block sets the parameters to exclude those WML that are
located in the cortex and those smaller than a user-selected minimum volume.
Peel to exclude cortical lesions (mm) – Parameter: WMLzoneDeflate (default: 3 mm) –
Thickness of the area along the edge of the WM mask to be removed by the Peel
command in order to exclude voxels with high-intensity FLAIR signal located
in the cortex and probably not lesions.
WML minimal size (mm^3) – Parameter: PepperThr (default: 12 mm^3) – Lower threshold
for WML size. In the final segmentation step, scattered WML voxels or clusters of voxels
below this threshold are removed from the WML mask.
To segment WML on multiple FLAIR series in batch mode, use FireVoxel
without any images open and select Applications >
White Matter Lesions (FLAIR-MPRAGE) batch measurement from DICOM.
Note:White Matter Lesions (FLAIR) batch measurement is a legacy command - do not use.
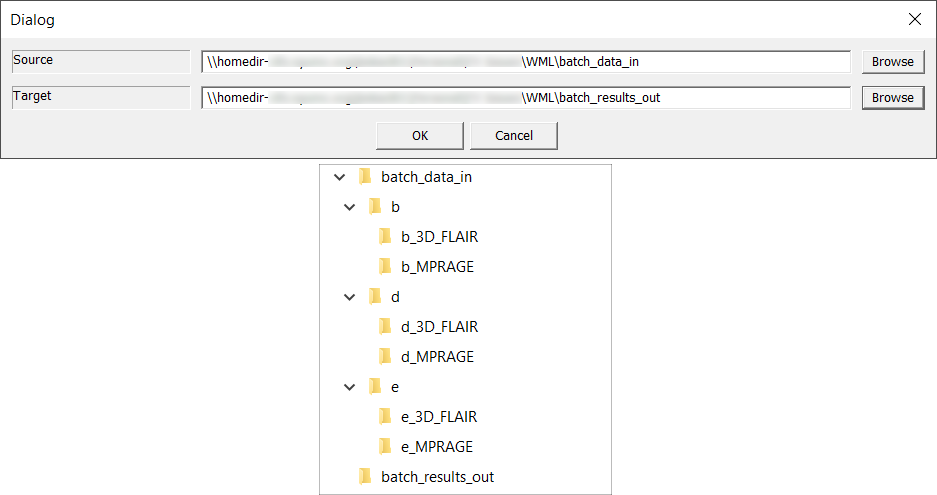
The batch command opens a dialog to select the source and target (input and output) directories
(Fig. 38.5, top). The source directory is expected to contain subfolders,
each of which should contain a folder with 3D FLAIR series in DICOM format
(Fig. 38.5, bottom). The target directory is where the results
are saved as FireVoxel documents (*.fvx). If this directory is not empty, the user will
see a warning that its contents will be overwritten by the new results.
After selecting the directories, click OK.
Fig. 38.5 WML batch mode dialog to select input and output folders (top) and expected folder structure
of input data (bottom). The source directory (batch_data_in) contains 3 folders
(for subjects labeled b, d, and e), each containing folders with FLAIR and MPRAGE series.
Next, the WML segmentation dialog will open to set up the segmentation parameters
(see WML Dialog). Select parameters and click OK to start processing.
If MPRAGE images are to be used for GM segmentation, click Use MPRAGE.
If any of the input data folders contain no MPRAGE, segmentation will be performed
without using MPRAGE.
After processing is completed, the results will appear in the target directory,
saved as FireVoxel documents, with each subject’s results in its own document,
containing FLAIR images, WML segmentation masks, and GM masks (if MPRAGE was used)
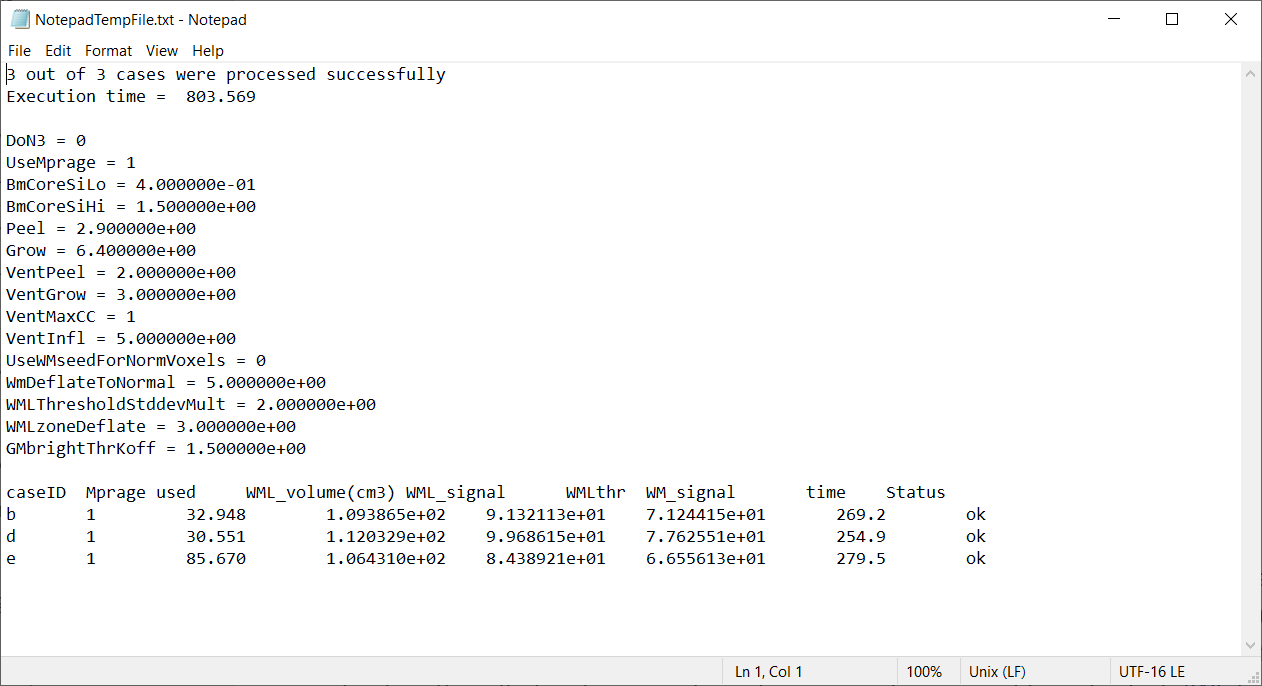
in different layers. The results log is written into a text file in FireVoxel’s
Temp directory (\FireVoxel\Temp\NotepadTempFile.txt).
This file contains a list of processing parameters followed by tab-delimited
processing results (Fig. 38.6).
Note: It is highly recommended to move this file to another location and rename it.
If the file remains in FireVoxel’s Temp directory, it may be overwritten by the output
from WML processing or other commands that generate text files.
Fig. 38.6 WML batch mode results log saved as NotepadTempFile.txt in FireVoxel’s Temp directory.