AutoFocus is a scheme that iteratively optimizes a voxel-based similarity
measure between two images, such as mutual information. Coregistration with AutoFocus
is a powerful and versatile coregistration method that can be used for coregistering
images from different imaging sessions and different modalities.
For images acquired in the same session, see the basic method for
coregistration using DICOM tags.
This section describes AutoFocus coregistration for 3D images.
FireVoxel also offers AutoFocus with motion correction for 4D coregistration.
During coregistration, the source image is transformed and superimposed onto
a fixed image called the target image, which remains unchanged.
Coregistration with AutoFocus may use a target ROI enclosing the organ or tissue
of interest to restrict coregistration and speed up processing. Coregistration can be
performed without the target ROI, but it may take much longer than with the ROI,
because coregistration is a computationally intensive task.
The target ROI can be created on the target image manually (using
the Paintbrush tool) or automatically, using
ROI operations or segmentation tools, such as EdgeWave.
The coregistration algorithm searches for a transformation that best matches
the source and the target volumes. This group of commands offers a choice
of transformations ranging from simple translations to affine transform.
The matching of the volumes is based on optimizing a similarity measure
(with a selection for different scenarios).
The transformation is computed in two stages, AutoFocus and Fine-tuning:
1. AutoFocus. The algorithm constructs a variety of transformations
with combinations of parameters that span a multidimensional grid.
The transformations include translation, scaling, rotation, and shear.
The transformations are ranked by how well they match the two volumes based
on the similarity measure. A user-selected number of the best transformations
is retained for the second, fine-tuning stage.
2. Fine-tuning. The algorithm performs iterative adjustment
of the best transformation parameters until it finds a local optimum
of the similarity measure. Finally, the transformed source image is interpolated
and saved as a new layer in the target image window.
Here we will describe coregistration with AutoFocus using
Register > Mutual Information with AutoFocus. Other variants
of AutoFocus commands are applied similarly.
1. Open the target window
in another document window.
2. Open the target window
in another document window.
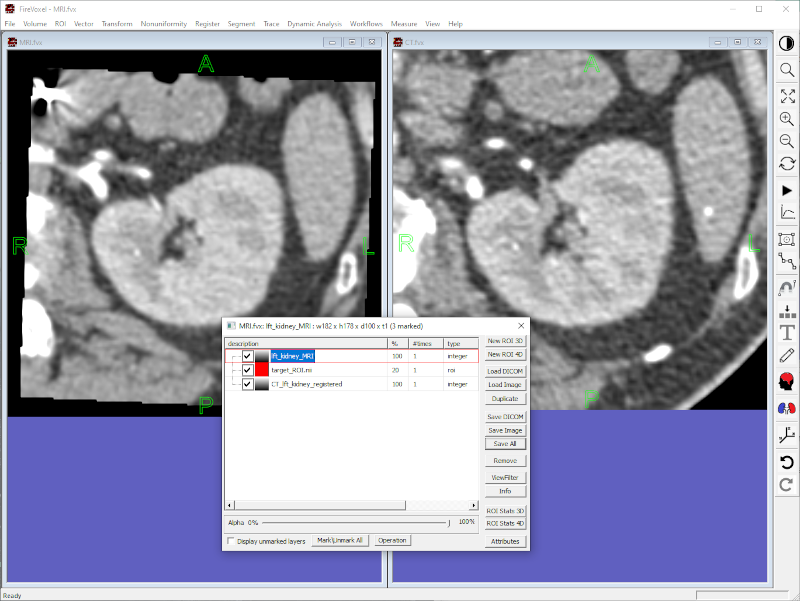
3. Define a rough target ROI around the organ or tissue of interest.
You may use manual or automatic segmentation tools (Fig. 22.1).
Manual ROI. Use Layer Control > New ROI 3D to create a new ROI layer.
Use the Paintbrush tool (Ctrl+Left mouse) to draw a rough
contour around the organ of interest. Define these contours on every few slices
(e.g., on every 5th slice). Next, use ROI > Morphology >
Fill 2D Contours and Morph Convex to fill the contours
and extend the ROI across slices. The resulting ROI should fully enclose the organ
or tissue of interest.
Fig. 22.1 Target image with target ROI (MR, right) and source image (CT, left).
4. Select the target window as the active window and select the base image as
the active layer. Select Register > Mutual Information with AutoFocus.
5. If the active layer is an ROI layer, a warning will be shown alerting the user
to this fact (Target is ROI. Proceed?).
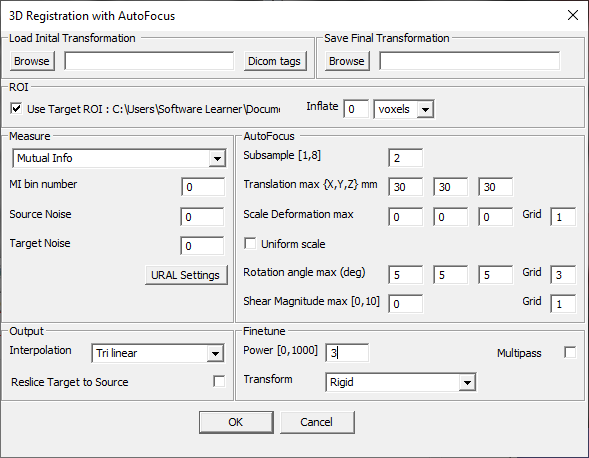
6. If the active layer is the base image (acquired image), a dialog window
will open to adjust parameters (3D Registration with AutoFocus).
7. Check Use Target ROI
box (checked by default if a visible ROI is present).
If no visible ROI is present, this box is grayed out.
8. Select suggested AutoFocus and Finetune parameter
(Fig. 22.3). It is recommended to start with
AutoFocus: Translation and Rotation only and Finetune: Transform > Rigid.
9. Click OK to start processing. Registration will commence.
Its progress will be indicated in the bottom right corner of the software window.
10. When registration is completed, a new layer with coregistered image will be created
in the target window (Fig. 22.2).
11. Check registration accuracy using Layer Control
> Alpha slider to adjust the transparency
of the coregistered layer.
12. If registration accuracy is unacceptable, repeat steps 5-11 and adjust
the coregistration parameters. As the first step, increase Power before
adjusting other parameters.
If suitable source and target images are present, Register >
Mutual Information with AutoFocus command opens a dialog panel
(3D Registration with AutoFocus, Fig. 22.3).
The components of this dialog are described below.
If one of the volumes is missing, an error message is shown
(No suitable source volume is found).
Loads transformation information from a previously saved
Volume Transform File (*.VTF).
Enter a path to the .VTF into the text box or click Browse to open
browse-for-file dialog to select a previously saved transform file.
Save the final transformation as *.VTF.
Enter the path to the file or click Browse to open browse-for-file dialog
to navigate to the destination directory and enter a file name.
Use Target ROI (checkbox) – If checked, the target ROI is used for
coregistration. If a visible ROI is present in the target window,
by default its name will be displayed here.
If the ROI is absent or invisible, this option is grayed out.
Inflate/units – Text box and drop-down menu to select the grow distance
(in voxels OPTION: MILLIMETERS?) by which the target ROI should be
inflated by the Grow command.
This block contains a dropdown menu with a selection of similarity measures
and related settings. The similarity measures range from simple
to complex and powerful:
Signal Difference (simple)
Cross Correlation
Image Ratio Uniformity
Mutual Info
Mutual Info Normalized
URAL
URALTAU (advanced)
Related settings include:
MI bin number – Number of bins in the mutual information method
Source Noise – Noise level in the source image (default: measured automatically)
Target Noise – Noise level in the target image (default: measured automatically).